4.1. Photoshop 5
4.2. Photoshop 4
4.3. ImageReady
4.4. Paint Shop Pro
4.5. The GIMP
4.6. Other Image Editors
To create a PNG image from scratch, one needs an image editor that understands PNGs. But there are many levels of understanding, and only a handful of editors exercise PNG's most interesting features. Here is a list of the support one would like to see in the ideal image editor:
Basic image types: RGB, grayscale, and palette-based
Images with fewer than 256 colors automatically saved as palette-based (or grayscale, if appropriate)
Option to quantize and dither images with many colors down to 256 or fewer
Simple transparency with any basic image type (i.e., single color marked as fully transparent)
Full alpha transparency (also known as alpha channel or alpha mask)
``Cheap'' RGBA-palette transparency (i.e., where each palette entry has red, green, blue, and alpha components)
Option to quantize and dither full RGBA images down to RGBA-palette images
Option to enable interlacing
Gamma correction, including calibration of display system
Color correction: either chromaticity, sRGB, or full ICC profiles
Ability to read, modify, and write 16-bit grayscale or 48-bit RGB images without conversion to lower bit depth
Reasonable default compression settings: adaptive filtering turned on for all image types except palette-based; ``medium'' zlib compression level (say, between 3 and 7); unused palette entries omitted; if simple/cheap transparency, palette ordered so that opaque transparency entries can be omitted
Options for both fast saves and best (slowest) compression
Ability to preserve and store user-defined text information
Not every feature is vital, of course, and some users may want only a subset of these. But particularly when it comes to web design, one would like full support for gamma correction and for PNG's various transparency capabilities, preferably with an option for best (or at least good) compression. On the other hand, when it comes to compression, one does not want to be overwhelmed with the minutiae of PNG's many compression parameters, particularly when PNG-specific optimization products exist (one of which will be covered in Chapter 5, "Applications: Image Converters").
In this chapter, I look at five of the most popular image-editing applications in detail, explaining how to invoke PNG-specific features and pointing out the limitations of each product. Because PNG's transparency options are among its most promising web-related capabilities, and because I wish to provide a concrete demonstration of the similarities and differences between the various editing programs, I will return to the sample editing task of Chapter 1, "An Introduction to PNG", An Introduction to PNG--namely, the step-by-step procedure for creating a soft ``portrait-style'' transparency mask in an existing image. At the end of the chapter, I list a couple of dozen other editors with PNG support.
Photoshop 5.0.2, available for Macintosh and 32-bit Windows, is the latest version of Adobe's flagship image editor, as of this writing. It supports colormapped, grayscale, and RGB PNGs at sample depths of 8 bits, and images optionally can be saved as interlaced. Alpha transparency is supported in grayscale and truecolor images, but there appears to be no way to add any sort of transparency to a palette-based image. Gamma and color correction are also supported, with one caveat; I'll come back to that shortly.
Photoshop 5 is modal, which is to say that images of a given type (e.g., RGB) remain of that type until explicitly converted to something else--a process that must occur before one attempts to save the image. For example, to convert an RGB or grayscale image to palette-based, follow this prescription:
Choose Image → Mode → Indexed Color, which pops up a dialog box.
Choose an appropriate Palette type (typically Adaptive).
Set the number of colors, either via the Color Depth selector or by entering the number explicitly in the Colors entry field.
Select a dithering method: None, Pattern, or Diffusion.
Choose Faster or Better color matching, and optionally check the Preserve Exact Colors box (disabled if no dithering).
Click the OK button.
The Color Depth selector rather disingenuously indicates bits per pixel, but it is actually nothing more than a shortcut for specifying a power-of-two number of colors--that is, 3 bits/pixel is 8 colors, 4 bits/pixel is 16, and so on. All settings result in 8-bit-per-pixel PNG files.
Note also that the Pattern dither type is known as ordered dithering in other contexts, while the Diffusion choice corresponds to Floyd-Steinberg or something similar. The latter generally looks much better, since human eyeballs are very good at noticing the regular patterns of an ordered dither.
Photoshop 5 includes a wizard for creating transparent images, but we'll step through the procedure manually. The key is not to rely on background transparency but instead to add a new layer representing alpha transparency. More specifically, given an image with or without background transparency, do the following to add an alpha channel to it:
In the Channels palette, click on the arrow at the upper right and select New Channel..., which pops up a dialog box.
In the Name: entry field, give the new channel a name (for example, Alpha) and click the OK button; the other fields can be left with their default values.
In the Channels palette again, return to the original RGB or grayscale channel.
Click on the Lasso tool (left side of tool palette, second from top).
In the Lasso Options tab of the tool palette, set the Feather radius to some value, perhaps 13.
Draw a loop around the face of the subject.
Do not invert the Lasso selection; instead go back to the Channels palette and select the alpha channel (the lassoed loop will still be visible on the blank channel).
Erase everything outside the loop via Edit → Clear.
Once again, return to the original RGB or grayscale channel via the Channels palette, and optionally click on the visibility box of the alpha channel to show its effects overlaid on the main image.
The preceding Lasso-related operations differ from those in every other image editor that I investigated, including Adobe's own ImageReady 1.0. Specifically, the requirement not to invert the selection in order to erase the outer part of the alpha channel seemed counterintuitive.[25]
[25] It should be noted, however, that I am by no means an expert with any of the image editors described here! It is entirely possible that there are settings or alternative approaches that conform more closely to the ``standard'' Lasso procedure used in the other programs.
Having added an appropriate alpha channel to the image, it may now be saved as a 16-bit gray+alpha or 32-bit RGBA PNG:
Choose File → Save a Copy..., which pops up the usual file dialog box.
Pick an appropriate directory and filename for the image, choose PNG as the format, and make certain the Exclude Alpha Channels checkbox is not checked.
Click the OK button, which triggers yet another dialog box.
Optionally create an interlaced PNG by selecting Adam7 as the interlacing type, and make sure the filter type is Adaptive for grayscale or truecolor images.
Click the OK button.
If transparency is only desired as an aid in creating the image, not as part of the actual file data, check the Flatten Image box in the Save dialog box.
Adobe made significant improvements to the overall handling of gamma and color correction in Photoshop 5, with explicit support for the new sRGB color space (see Chapter 10, "Gamma Correction and Precision Color") and a number of other standard color spaces, as well. Photoshop 5 also includes an option to enable Monitor Compensation (which requires that the monitor be specified correctly first), and it always saves gamma and color-correction information with PNG images.
Unfortunately, the gamma information PS5 saves in PNG images is wrong; it is always too small by a factor of two, resulting in images that display much too darkly. This is a significant problem, because it appears only to affect PNG images. In other words, one cannot simply make the appropriate compensation in Photoshop's RGB setup panel and forget about it; either PNG images will be written incorrectly, or all other image types will be read and written incorrectly. The only workaround within Photoshop 5 is to misadjust the display gamma setting just before saving a PNG image and to reset it just after saving. For example, in a typical Windows PC (or other sRGB display system) with a gamma value of 2.2, temporarily change the value to 1.1 in Photoshop's RGB Setup box (shown in Figure 4-1):
Choose File → Color Settings → RGB Setup...
Halve the Gamma: value (i.e., if it was 2.2, change it to 1.1).
Click the OK button.
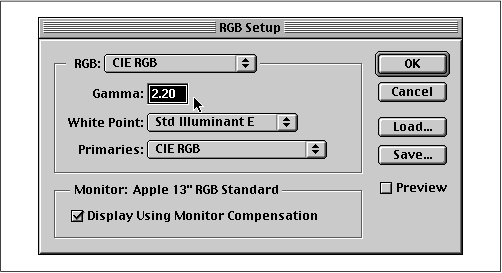 Figure 4-1: Photoshop 5 RGB Setup window. |
Then save the file in PNG format as before, but when finished, be sure to change the value back! Clearly, this is a crude and painful workaround.
An alternative, available at least to DOS, Windows, and Unix users, is to use a third-party utility to change the gamma values in all of the PNG files after they're saved. One such utility is pngcrush, which I'll discuss in some detail in Chapter 5, "Applications: Image Converters". For a system with a gamma value of 2.2, which should correspond to a PNG file gamma of 0.454545 (or 1/2.2), the following command will replace the incorrect gamma information and write the fixed PNGs into a directory called fixed/:
pngcrush -d fixed -replace_gamma 0.454545 foo.png foo2.png ...
Newer versions of pngcrush support a simpler approach, tailor-made for Photoshop 5:
pngcrush -d fixed -double_gamma foo.png foo2.png ...
In addition to writing incorrect information in PNG files, Photoshop 5 appears to ignore any existing color space information when reading PNG files. Although one could, in principle, read the PNG gamma and chromaticity information and set up a custom RGB profile that matches it, this would have to be done manually and requires significant effort and knowledge on the part of the user. In other words, only the most dedicated experts are likely to be able to accomplish it, or even to bother with it in the first place.
Photoshop 5 has several other quirks, as well. As I mentioned earlier, palette-based images are always saved with 8-bit pixels and 256 palette entries, regardless of how few colors are actually used; for a bicolor image, this can result in a bloat factor of eight or more, compared to a properly optimized image. Adobe's rationale seems to be that this sort of optimization should be handled in a web-specific application like ImageReady. But leaving aside the fact that ImageReady 1.0 has similar problems, one would expect a high-end editing application like Photoshop (with its high-end price tag) to do much better.
Photoshop's PNG-related user options are overly technical and can also result in files that are larger than necessary. For example, for most users a simple Interlaced checkbox would suffice; there is no need to know that PNG's interlacing method is formally known as Adam7. Similarly, the ability to specify individual compression filters is nice from a theoretical standpoint, but 99% of users are not going to waste their time experimenting with the six choices Photoshop allows. Most will instead stick with the default value, which is often None (but sometimes Adaptive) and is rarely correct for the given image type. As a rule of thumb, palette-based images should always use None, and grayscale and truecolor images should always use Adaptive. There are very rare cases in which another choice will be better, but they are difficult to predict, and the difference in file size will usually be minimal anyway. In fact, Photoshop should probably offer only these two options in the first place. Oddly enough, Photoshop offers the user no control at all over the compression engine itself, even though this is much easier to understand conceptually and has a more predictable impact on the file size. Photoshop's hardwired compression setting seems to correspond to level 6 in most other implementations.
Photoshop 4 had little or no support for 16-bit-per-sample images; this, together with improved color management, was one of the major new features in version 5. Unfortunately, due to a programming oversight, 16-bit support was not extended to include PNG. On import, 16-bit PNG images are converted to 8-bit samples, and on export, PNG is not offered as an option for 16-bit images. Adobe has indicated that this will be addressed in the next major release.
Photoshop also lacks support for embedded PNG text annotations, despite allowing the user to enter an extensive set via the File → File Info... dialog box; these can only be saved to an external file. This is particularly surprising given the presence of checkboxes allowing one to Mark as Copyrighted (in the File Info dialog box, shown in Figure 4-2) and Exclude Non-Image Data (in the Save dialog box). The former option has to do with digital watermarking and the copyright symbol in Photoshop's titlebar. As to the latter option, text data is always excluded from the file.
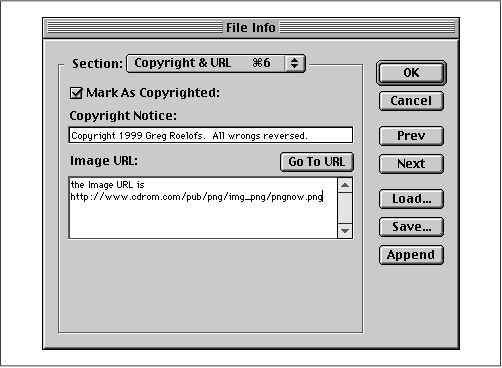 Figure 4-2: Photoshop 5 File Info window. |
Most critically, Photoshop has absolutely no support for transparency in colormapped PNG images. When an RGBA or gray+alpha image has been converted to indexed mode, only the non-alpha data is affected; that is, Photoshop still indicates two channels, one for the indexed color data and one for the (unchanged) alpha channel. Attempting to save such an image is an exercise in frustration, however: in the Save As dialog, PNG is grayed out even though GIF is allowed (and indeed, a GIF saved in this way will have binary transparency corresponding approximately to the alpha channel). In the Save a Copy dialog, PNG is allowed, but the Exclude Alpha Channels box is both checked and grayed out.
Overall, it is evident that Adobe's attention was devoted more to enhancing generic editing features than to providing comprehensive support (or, in some cases, even basic support) for the three-year-old PNG format. In fact, PNG support seems almost to have been an afterthought, even in version 5.0. This may be reasonable from a business perspective, but it is nevertheless disappointing, given that PNG's capabilities map so closely into Photoshop's.
Further information about Photoshop is available from Adobe's web pages at http://www.adobe.com/prodindex/photoshop/.
Photoshop 4 is still in wide use and has a slightly different feature set from version 5, so we'll look at it in some detail, too. It supports the same basic PNG feature set the newer version does: colormapped, grayscale, RGB, and RGBA PNGs at sample depths of 8 bits or less, optionally interlaced, with no palette transparency or text support. Like PS5, it too has a gamma-related quirk, though not as severe. I'll discuss it in a moment.
Photoshop 4's support for PNG alpha channels is sufficiently well hidden that Jordan Mendelson set up a web page describing the step-by-step procedure for creating one, http://jordy.wserv.com/experiments/png.html. The approach is very similar to that in Photoshop 5, with the exception of the steps needed to actually modify the alpha channel for a portrait-style mask:
In the Channels palette, click on the arrow at the upper right and select New Channel..., which pops up a dialog box.
In the Name: entry field, give the new channel a name (for example, Alpha) and click the OK button; the other fields affect only how the alpha channel is displayed, not the actual image data, and can be left with their default values.
In the Channels palette again, leave the alpha channel as the selected one, but make the original RGB or grayscale channel visible by clicking on the small box to its left (an eyeball icon will appear in the box). The main image will now be visible under a 50% red ``haze'' that represents the alpha channel, assuming the default options in the previous step's dialog box were left unchanged.
Double-click on the Lasso tool (left side of tool palette, second from top).
In the Lasso Options tab of the tool palette, set the Feather radius to some value, perhaps 13.
Draw a loop around the face of the subject, but do not invert the selection.
Erase everything outside the loop via Edit → Clear; a soft-edged hole will appear in the red overlay, indicating that everything but the face of the subject is masked out.
Once the alpha channel is created, the whole image may be saved as a 16-bit gray+alpha or 32-bit RGBA PNG just as in Photoshop 5:
Choose File → Save a Copy..., which pops up the usual file dialog box.
Pick an appropriate directory and filename for the image, choose PNG as the format, and make certain the Don't include alpha channels checkbox is not checked.
Click the OK button, which triggers yet another dialog box.
Optionally create an interlaced PNG by selecting Adam7 as the interlacing type, and make sure the filter type is Adaptive for grayscale or truecolor images.
Click the OK button.
If transparency is desired only as an aid in creating the image, not as part of the actual file data, go to the Layer menu and select Flatten Image before saving.
Gamma and color-correction information is always saved with PNG images, but in order for it to be meaningful (that is, not wrong), the monitor settings must be entered correctly in the Monitor Setup box, accessed via File → Color Settings → Monitor Setup (shown in Figure 4-3).
 Figure 4-3: Photoshop 4 Monitor Setup window. |
The information can either be entered explicitly, by providing values for the display system's ``gamma'' value, white point, and phosphor types (see Chapter 10, "Gamma Correction and Precision Color" for a more detailed explanation of these terms), or it can be done implicitly, by selecting a monitor type from a list of calibrated models. The implicit approach may not work exactly as intended, however; the default gamma value seems to be 1.8, whereas almost all PC display systems are closer to 2.2. Either way, there is one more setting, and this is where the caveat I mentioned earlier comes in. For the Ambient Light setting, only the Medium value will cause Photoshop to save correct gamma information in the PNG file. The High setting will result in a PNG gamma value that is too small by a factor of two,[26] while the Low setting results in a value that is 50% too large. Of course, this is still preferable to the case with Photoshop 5.0; at least Photoshop 4.0 has one setting that works correctly.
[26] Adobe's definition of ``high'' ambient light appears to involve something on the order of a spotlight shining in the user's face.
In other respects, Photoshop 4 is no different from version 5. It lacks support for text annotations, 16-bit samples, low-bit-depth samples and palette transparency, and its compression settings and interface are identical--that is, mediocre at best.
ImageReady is Adobe's Web-specific image editor for 32-bit Windows and the PowerPC-based Macintosh. It provides a number of ways to optimize the size and content of images and can be used either as a back end to Photoshop or as a standalone product. Its capabilities and structure are quite similar to those of Macromedia's Fireworks.
ImageReady 1.0 supports both 24-bit RGB PNGs and 8-bit palette-based PNGs, which it refers to as ``PNG-24'' and ``PNG-8'' files, respectively. There is no direct support for grayscale images, but it is possible to convert a color image to what is basically grayscale (Image → Adjust → Desaturate) and save it as an 8-bit colormapped image with nothing but shades of near-gray in the palette. Interlacing, simple transparency, and full alpha transparency are supported, but the program appears not to allow single-color transparency in RGB images, and its implementation of PNG's RGBA-palette mode is almost useless. I'll take a closer look at that in just a moment.
The procedure for adding portrait-style transparency to an existing RGB image is similar to that for Fireworks and Photoshop. As before, open the file and use the Lasso tool to select the region of interest:
Choose File → Open.
Click on the Lasso tool (left side of tool palette, second from top).
Draw a loop around the face of the subject.
Invert the selection so that the part outside the loop gets erased (Select → Inverse).
Select → Feather... and set the Feather Radius to some value, perhaps 13.
Erase everything outside the loop via Edit → Clear.
Note that, unlike Fireworks's feather radius, ImageReady's extends to both sides of the lassoed path; that is, there will be partially transparent pixels both inside and outside the selection. Thus, we drew our loop a bit bigger here and set the feather radius to roughly half of what it was in the Fireworks example.
Saving the newly cropped image as a 32-bit RGBA PNG is straightforward:
Open the Optimize palette (subwindow), shown in Figure 4-4, if it isn't already popped up (Window → Show Optimize).
Select PNG-24 from the pull-down list at the upper left.
In the Matte: pull-down list, select No Matte (which will then display in the box as ``None'').
Check the Transparency checkbox.
Optionally check the Interlaced checkbox to make an interlaced PNG.
Choose File → Save Optimized As... and pick an appropriate directory and filename.
The PNG-24 Optimize palette is shown in Figure 4-4. The Transparency checkbox is rather misleading; leaving it unchecked indeed creates a completely opaque image, but ImageReady nevertheless writes a full 32-bit RGBA file! That is, the alpha channel is still there, but it is completely blank. One can only hope that this is an oversight and that it will be corrected in the next release; such files can hardly be considered ``optimized.''
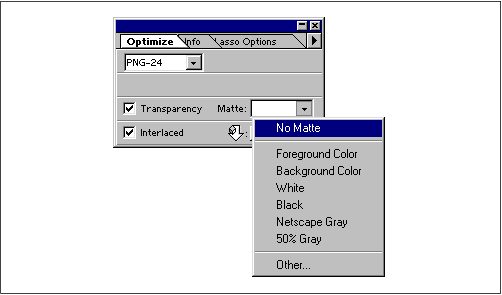 Figure 4-4: ImageReady Optimize palette for 24-bit PNG, with Matte pull-down menu. |
Things get more interesting in the palette-based case. As before, the action takes place in the Optimize palette, as shown in Figure 4-5:
Select PNG-8 from the format pull-down list.
Select an appropriate palette type from the pull-down list on the second line (Perceptual is the default).
Select No Matte from the Matte: pull-down list.
Set Colors: to 256 or Auto.
Set Levels: to 1 (which will reduce the Colors: setting to 255).
Optionally check the Interlaced checkbox.
Choose File → Save Optimized As... and pick an appropriate directory and filename.
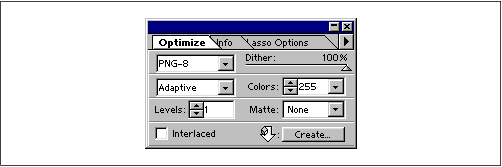 Figure 4-5: ImageReady Optimize palette for 8-bit (colormapped) PNG. |
Because the number of transparency levels was set to 1, this procedure will create an image with binary transparency; there will be a sharp cutoff at the lassoed boundary. (If the main image window is showing the Optimized tab instead of Original, the effects of the Optimize palette will be displayed in ``real time,'' more or less.) How about a nice RGBA-palette image? One might imagine that between 4 and 16 transparency levels would suffice with dithering turned on, but the Levels spin button actually indicates the number of palette entries with transparency, not the number of transparency levels. Thus, even 160 ``levels'' is insufficient in our portrait example. This is largely due to ImageReady's strange optimization algorithm, which seems to prefer dark colors for transparency. Figure 4-6 shows the result; note the speckled appearance of the letters on the right side and the odd banding appearance (almost like an edge-detection algorithm) on the left.
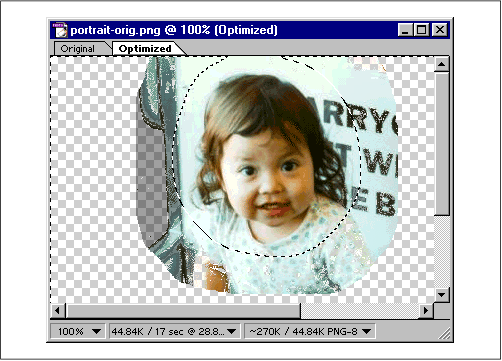 Figure 4-6: ImageReady optimized preview with 160 transparent entries, showing artifacts. |
For this image, a levels setting between 220 and 230 worked best, at least for transparency. The drawback is that this leaves only 26 to 36 colors for the opaque regions. For facial tones, that is simply not enough--one loses many of the saturated colors and most of the fine gradients and shading, leaving skin tones flat and grainy. And on top of that, the transparent regions show distinct banding, even with the large levels setting. See Figure 4-7 for an example with levels set at 224.
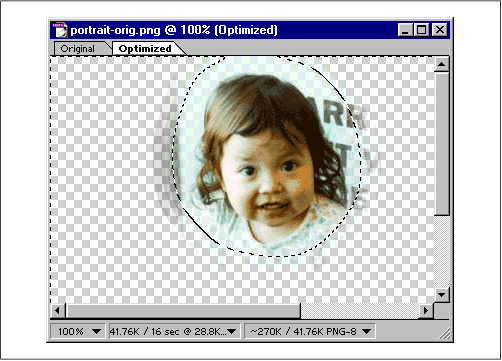 Figure 4-7: ImageReady optimized preview with 224 transparent entries, showing degraded facial tones. |
Overall, ImageReady's PNG support is adequate, but it seems probable that GIF and JPEG were considerably higher priorities. The PNG-24 mode is excellent for images with full alpha channels, but the 33% size penalty incurred by opaque RGB images (thanks to the extraneous alpha channel) is unlikely to win friends in the web design crowd. PNG-8 is fine for opaque images with more than 16 colors, but low-color images are always saved at 8 bits per pixel, resulting in files that are too big by a factor of anywhere from two to eight. PNG-8 images with transparency, in addition to suffering the quantization problems noted previously, appear always to be saved with as many transparency entries as palette entries, resulting in up to 255 wasted bytes per image.
On the positive side, ImageReady supports interlacing with no trouble, and it preserves existing Copyright text chunks while allowing authors to change or add a new one. The procedure for adding one is simple:
Choose File → Image Info...
Fill in the Copyright: field appropriately (e.g., ``Copyright 1999 O'Reilly and Associates. All rights reserved.'').
Click the OK button.
The only other supported text keyword is Software, which ImageReady always writes automatically (``Adobe ImageReady''); it replaces any previous Software text chunk. All other text chunks are discarded, and there is no provision for authors to add others.
What about gamma and color correction? At first glance, ImageReady appears to support gamma, but this is mostly illusory. It does allow one to adjust the image appearance with a gamma slider (Image → Adjust → Gamma...), but doing so modifies the pixels directly, and information about the adjustment is not saved with the file. In other words, the same image will look different on different systems. Nor is the effect remembered, other than as part of ImageReady's Undo capability--changes to the gamma setting become permanent as soon as the OK button is clicked. PNG files that already have gamma chunks are treated the same as those without; the gamma information is discarded.
ImageReady's compression of PNG images is fair but by no means optimal. I already noted that colormapped images with just a few palette entries are saved at a higher bit depth than is necessary and that palette-based transparency information is stored inefficiently. On top of that, though, pngcrush (discussed in Chapter 5, "Applications: Image Converters") was able to achieve compression improvements of between 6% and 45% on 22 variations of my test image, averaging around 12% overall. The reasons for this are not immediately obvious, however; ImageReady's compression settings seem reasonable, and it does use dynamic filtering on truecolor images.
The ImageReady home page is at http://www.adobe.com/prodindex/imageready/.
Jasc's Paint Shop Pro 5.0 is a capable and popular program for image editing; it is also quite affordable. Version 5.0 supports only 32-bit Windows, but version 3.12 is still available for Windows 3.x and NT 3.51 and also supports PNG. We'll only be looking at the newer release, however.
At the most basic level, PSP supports the three major PNG image types: colormapped, grayscale, and RGB, both interlaced and noninterlaced. It provides options for converting between types, but it does not do so automatically; if a ``16-million-color'' image happens to use only 200 colors, it will still be saved as 24-bit RGB unless the user specifically asks for conversion to a palette image. Both GIF-style transparency (one completely transparent palette entry) and full 32-bit RGBA are supported, but RGBA-palette mode is not.
Paint Shop Pro's interface for adding an alpha mask to an image is quite elegant. First, open an ordinary RGB image, then pop up the Add Mask From Image dialog box, shown in Figure 4-8:
Choose File → Open.
Choose Mask → New → From Image.
Choose Mask → Edit.
The second step brings up the dialog box, shown in Figure 4-8. Setting the source to This Window guarantees that the size is correct, and basing it on the Source Opacity, where the original image had no transparency at all, will produce a blank slate on which gradients and other fills can be placed. Choosing the Source luminance button instead will generate transparency according to the light and dark areas in the image itself, and the areas that are considered transparent can be inverted by checking the Invert mask data checkbox at the bottom. Either way, the mask can be edited as an ordinary grayscale image after the third step.
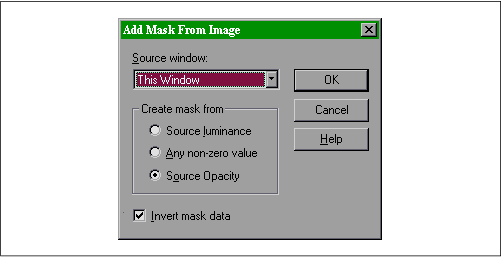 Figure 4-8: Paint Shop Pro alpha mask window. |
Saving such an image is a two-step procedure. First, the alpha mask must be ``glued'' to the main image as its alpha channel, after which the standard save procedure applies:
Choose Mask → Save To Alpha Channel.
Choose File → Save As (or Save Copy As).
Converting an existing truecolor image to palette-based or creating a new palette-based image involves essentially the same procedure:
Choose File → Open or New.
Choose Colors → Decrease Color Depth → 256 Colors.
Other depths are available, but most create the same size palette; indeed, the only other supported palette sizes in the output file are 2 and 16 colors. For an existing image, a dialog box will pop up offering different quantization methods (in the Palette section) and dithering methods (in the Reduction method section). Note that Nearest color means no dithering; Error diffusion is generally the nicest looking but slowest approach, sometimes known as Floyd-Steinberg or ``FS'' dithering in other programs. To add and view transparency, use the Colors menu again:
Choose Colors → Set Palette Transparency.
Choose Set the transparency value to the current background color.
Choose Colors → View Palette Transparency.
To set a color other than the background color as transparent, use the eyedropper tool to pick the color and find its index. Then, in place of the second step, select Set the transparency value to palette entry and enter the index value of the color.
Paint Shop Pro currently does not support gamma correction, even though it does provide a Monitor Gamma Adjustment window (via File → Preferences → Monitor Gamma) that could in theory be used to supply the appropriate information. PSP does add a modification-time chunk, but it is incorrectly written using the local time zone of the user rather than Universal Time as required by the PNG specification.
Text annotations, including those found in other file formats, are preserved and converted as needed. In addition, the user may add text chunks with the Title, Author, Copyright, and Description keywords via View → Image Information option. The program stores DOS-style line endings (both ``carriage return'' and ``line feed'' character codes) rather than following the PNG spec's recommendation to use Unix-style line endings (line-feed characters only).
With regard to file sizes, Paint Shop Pro always uses near-optimal compression and filtering settings on the image data. There is no option for faster compression, although PSP's own format is typically used for intermediate saves. The program's only major failing in this regard is that it always writes the maximum number of palette entries regardless of how many are used, and it doesn't reorder the palette so that the single transparent entry comes first, which would allow the remainder of the transparency chunk to be omitted. For a 50-color web icon with no transparency, this means the file will be 618 bytes larger than it should be, solely due to the overhead required to store a full 256 palette entries. With transparency, an average of 25 additional bytes would be wasted for this example, but the cost for true 256-color images may be as much as 255 bytes. As I've noted elsewhere, that can be a serious penalty for small images. In addition, PSP doesn't support writing three- or four-color images with 2 bits per pixel but instead will use 4 bits. Compression almost never makes up the difference; the output file will be roughly twice as large as it should be.
More information about Paint Shop Pro is available at Jasc's web site, http://www.jasc.com/psp.html.
The only offering in our roundup that is available for Linux, the GNU Image Manipulation Program, is also unique in that it may be obtained for free, with complete source code, if desired. Originally written for Unix and the X Window System, the GIMP (or Gimp) is also being ported to OS/2 and 32-bit Windows.[27] I tested version 1.0.2, the latest nondevelopment release as of this writing, under Linux 2.0. PNG support is handled via a plug-in with its own release schedule, though. A considerably improved version (1.1.7) was released in late February 1999, after my tests; I'll note its changes as we go.
[27] Not only that, but the Windows port even runs under the Windows emulator WINE, making it one of the few large applications that can be run simultaneously as a native Linux application and as an emulated Windows program. Of course, that would be a fairly twisted thing to do.
Like Photoshop, the GIMP uses a modal approach to the basic image types, requiring an explicit conversion between RGB, grayscale, and indexed-color images. Both alpha channels and gamma correction are supported, albeit at a relatively basic level; I'll discuss the details shortly. Currently, the standard GIMP release does not support sample depths greater than 8 bits, but a separate development fork known as GIMP16 (or informally as ``Hollywood'') has extended the GIMP's core to operate on deep pixels and is expected to merge with the main development fork in the 2.0 time frame. There was no support for text annotations in the stock 1.0.2 release, but version 1.1.7 of the PNG plug-in appears to have added support for user-specified Title, Author, Description, Copyright, Creation Time, Disclaimer, Warning, Source, and Comment keywords; the Software keyword is added automatically. The newer plug-in release also supports timestamps via PNG's tIME chunk (described in Chapter 11, "PNG Options and Extensions").
The GIMP employs Photoshop's layer-based editing model and in general will be familiar to anyone comfortable with Photoshop. The user interface does differ in one significant respect, however: instead of a large parent window with a main menu bar and various child windows inside, the GIMP uses separate, standalone windows for everything, and the functions corresponding to Photoshop's main menu are instead accessible via the righthand mouse button. At its most minimal, the GIMP consists only of the small tool-palette window, which contains a truncated File menu from which one can create a new image or open an existing file.
Conveniently enough, that leads us directly into our portrait example:
Choose File → Open and select an appropriate truecolor image.
Click the right mouse button over the image and select Layers → Add Alpha Channel, after which the titlebar will indicate (RGB-alpha) instead of just (RGB).
Click on the Lasso tool (upper right corner of the tool palette).
Hold the right mouse button and choose Dialogs → Tool Options....
Click on the Feather checkbox and set the Feather Radius slider to some value, perhaps 25.
Draw a loop around the face of the subject.
Invert the lasso selection: hold the right button and choose Select → Invert.
Erase everything outside the loop: hold the right button and choose Edit → Clear.
Aside from the use of the right mouse button instead of a menu bar, the procedure is almost identical to that in each of the other applications I've investigated. Note that the GIMP's feathering extends to both sides of the lassoed path, much as ImageReady's does. Unlike ImageReady, however (but similar to Fireworks), GIMP's ``radius'' appears to indicate the total width of the alpha band, not just half of it. The Lasso options box, the tool palette, and the main image window are shown overlapped in Figure 4-9. (Ordinarily, the first two float elsewhere on the desktop.)
To save the image as a 32-bit RGBA PNG, bring up the Save as dialog:
Hold the right mouse button and choose File → Save as.
Pick an appropriate directory and filename for the image, and either choose PNG explicitly from the drop-down file type list or do so implicitly by typing the .png filename extension.
Click the OK button, which brings up the PNG Options dialog box.
Set the Compression level slider to an appropriate value and optionally check the Interlace checkbox.
Click the OK button.
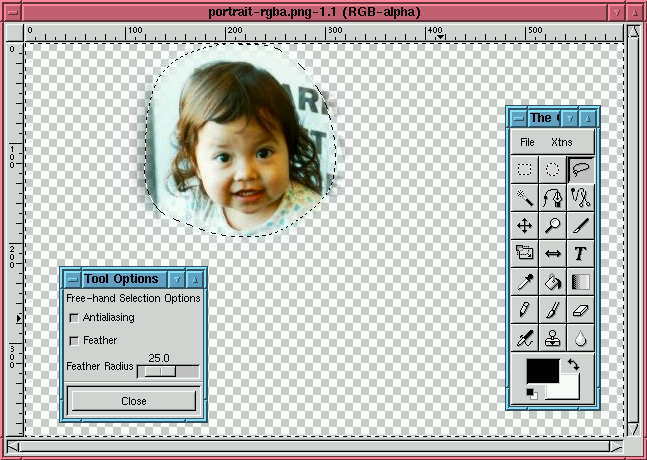 Figure 4-9: The GIMP's Lasso options window, tool palette, and main image window. (Click on image for full-scale version.) |
The compression-level slider actually allows noninteger values, but it appears to truncate the fractional part. Thus, for maximum compression, the slider must be set at 9.0 exactly. For typical usage, 6.0 is fine, and for quick saves with decent compression, use 3.0.
Conversion of an RGB image (with or without an alpha channel) to grayscale or to indexed-color is accomplished via the right mouse button's Image submenu, either the Grayscale or Indexed items. Going from 32-bit RGBA to 16-bit gray+alpha is quite fast, and the GIMP saves the result properly as a gray+alpha PNG file. Similarly, converting plain RGB or grayscale to indexed-color mode works well and saves correctly. But conversion of RGBA or gray+alpha to Indexed is problematic with the stock 1.0.2 PNG plug-in. GIMP's internal palette model appears to be GIF-like in that there's no evidence that it supports partial transparency in indexed images; the main image display switches to a hard-edged mask with only fully transparent and fully opaque regions visible. More serious is the fact that even this much transparency results in a truncated file, a core dump (though not a termination of the other GIMP windows), and a pop-up error box indicating that the save failed. Perusal of the older PNG plug-in's source code strongly suggests that transparency support for indexed images was never implemented. Fortunately, Yamahata Kenichiro addressed this in version 1.1.7 of the plug-in, but I did not have a chance to investigate how it works.
Aside from that and a lack of support for text comments, the only other PNG-related problem seems to be in the gamma chunk. Version 1.0.2 of the GIMP has no support for monitor settings or calibration, and in the absence of those, it should assume a PC-like (or sRGB) environment on PCs and most workstations. That is, the gamma value it writes to file should be the inverse of 2.2. But the stock PNG plug-in actually writes 1.0, a value that causes images to appear extremely washed out when viewed with a gamma-aware application (unless the originating machine was a NeXT workstation). Fortunately, the developers addressed this problem within 24 hours of its having been reported, and version 1.1.7 of the PNG plug-in includes the fix (as will the next full release of the GIMP, presumably). Images saved under older versions can be corrected in a batch operation with a tool such as pngcrush. The following example performs a batch correction and puts all of the fixed images into a subdirectory called fixed/:
pngcrush -d fixed -replace_gamma 0.454545 foo.png foo2.png ...
The GIMP's compression of PNG files is excellent, with the program choosing the proper filtering strategies for both palette-based and continuous-tone images. pngcrush, covered in Chapter 5, "Applications: Image Converters", was unable to eke out any improvement in file size beyond that due to eliminating the overhead of multiple image-data chunks, which amounts to a mere 12 bytes per 8,204-byte chunk, or less than 0.15% of the overall file size.
The main GIMP home page is at http://www.gimp.org/, with extensions available from the plug-in registry, http://registry.gimp.org/ (including the PNG plug-in at http://registry.gimp.org/detailview.phtml?plugin=PNG+for+GIMP+1.0/0.99.x). The GIMP16 project has a separate home page at http://film.gimp.org/.
Many other editing applications also support PNG. All of the known ones are in the following list, with the version number of the latest release (as of early 1999) given wherever possible.
Version 2.6, Haage & Partner Computer. Available for Amiga; read/write support for PNGs; full (32-bit) alpha support.
http://www.haage-partner.com/ae_e.htm
Version 1.1, Sum Software. Available for BeOS PPC/x86; read/write support for PNGs; full (32-bit) alpha support; no gamma support.
http://www.sumware.demon.nl/products/becasso/
Version 6.0, Deneba Software. Available for 32-bit Windows and Mac PPC; read/write support for PNGs. Emphasizes extensive support for transparency, alpha channels, and anti-aliasing, but the demo version does not allow images to be saved, so its level of PNG transparency support (if any) is not known.
http://www.deneba.com/dazroot/prodinfo/canvas6/info.html
http://www.spg-net.com/product2.html
http://www.corel.com/products/graphicsandpublishing/draw8/
http://www.xara.com/noframes/corelxara/
Version 4.0, MicroFrontier. Available for Mac 68k/PPC; read/write support for PNGs; no gamma support.
http://www.microfrontier.com/products/enhance40/
Version 8.0.1, Macromedia. Available for 32-bit Windows and Mac PPC; read/write support for PNGs; full (32-bit) alpha support.
http://www.macromedia.com/software/freehand/
Version 5.0, SoftQuad. Available for 32-bit Windows (version 3.0 was available for 16-bit Windows); read/write support for PNGs. This is actually an HTML editor, but versions 3.0 and later incorporate an image editor as well. In version 5.0, the bundled image application is Ulead's PhotoImpact 3.02 SE.
http://www.sq.com/products/hotmetal/
Version 8.0, Adobe. Available for 32-bit Windows and Mac PPC; read/write support for PNGs.
http://www.adobe.com/prodindex/illustrator/
Version 1.5, Microsoft. Available for 32-bit Windows; read/write support for PNGs; full (32-bit) alpha support. This was originally known as Altamira Composer and was bundled with FrontPage 98; it appears to have been superseded by PhotoDraw 2000.
http://www.microsoft.com/imagecomposer/
http://www.novadesign.com/fxinfo.htm
Version 5.2, Ulead Systems. Available for 32-bit Windows; read/write support for PNGs.
http://www.ulead.com/mspro5/
http://www.netstudio.com/product.html
http://www.cloanto.com/amiga/programs_ppaint.html
http://www.microsoft.com/office/photodraw/
Version 4.2, Ulead Systems. Available for 32-bit Windows; read/write support for PNGs; no gamma support in version 3.0 (unknown in 4.0).
http://www.ulead.com/pi/
Version 4.57, Computerinsel. Available for 32-bit Windows; read/write support for PNGs; version 2.x reportedly had problems saving alpha channels.
http://www.pl32.com/
http://www.chrome-imaging.com/photonyx.html
Version 0.4, Peder Blekken. Available for BeOS PPC; read/write support for PNGs (in fact, PNG is the only supported output format).
http://www.be.com/beware/Graphics/Picnic.html
http://www.micrografx.com/picturepublisher/
Version 2.5, Spaceward Graphics. Available for 32-bit Windows; read/write support for PNGs; full (32-bit) alpha support; may include support for images with 16-bit sample depth.
http://www.satoripaint.com/
Version 2.03, Nothing Real. Available for SGI IRIX and 32-bit Windows; read/write support for PNGs; full support for images with 16-bit sample depth; full alpha support (32-bit and 64-bit); partial (write-only) gamma support.
http://www.nothingreal.com/Products/
http://www.ulead.com/vs/
Version 5.0, Visio. Available for 32-bit Windows (version 4.1 is still available for Windows 3.x); read/write support for PNGs.
http://www.visio.com/products/
Version 2.11, Group 42. Available for 32-bit Windows (version 1.72 is still available for Windows 3.x); read/write support for PNGs.
http://www.group42.com/webimage.htm
Version 3.0.5, Totally Hip Software. Available for Mac PPC and 32-bit Windows; read/write support for PNGs.
http://www.totallyhip.com/Link/ProductsWP3.html
http://www.blackbelt.com/wi_r5_dt.html
http://www.xara.com/noframes/webster/
Version of June 5, 1998, Rick Hohensee and others. Available for Unix/X; read/write support for PNGs; no alpha support. This is a ``mutant spawn'' of XPaint with emphasis on mouse-based freehand drawing.
http://linux01.gwdg.de/~rhohen/linux.html
http://www.ibiblio.org/pub/Linux/apps/graphics/draw/xart19980605.tgz
Version 2.5.6, David Koblas, Torsten Martinsen, and others. Available for Unix/X; read/write support for PNGs; no alpha support.
http://www.image.dk/~torsten/xpaint/
Version 3.0, Macromedia. Available for 32-bit Windows and Mac 68k/PPC; read/write support for PNGs; full (32-bit) alpha support; no gamma support.
http://www.macromedia.com/software/xres/
New image editors with PNG support and updated information on the editors in the preceding list can be found at the Image Editors with PNG Support web page http://www.libpng.org/pub/png/pngaped.html. This URL should remain valid for at least a few years, but there are never any guarantees on the World Wide Web. Should the link ever break, use a search engine to look for the page's title string or for one of the more oddly named utilities or companies listed.